Resin Fin - Initial Thoughts and Impressions
I’ve been lucky enough to get my hands on an early production version of the Resin Fin, as I’m working on a gateway-like platform for a client. I was intrigued when I first heard that Resin was making their own hardware as industrialised IoT platforms, especially those using the Raspberry Pi (RPi) Compute Module, are few and far between.
Resin has included some interesting features with the Fin, such as the addition of a Samsung Artik 020 co-processor as well as a mini PCI-E expansion socket (along with a nano-sim reader). Although I’ve had the Fin for a couple of weeks now, I intend to follow up this blog post with more details when Resin releases their public documentation for the device as there are still some pre-production complexities with software and set up.
Please take note that this is an initial impressions and not a my final opinion due to this being preproduction device.
What is Resin?
For those reading this initial impressions post and are unfamiliar with Resin, Resin is a scalable platform for managing fleets of IoT devices. It’s built around a containerized Linux operating system that runs on deployed devices (think Docker for IoT). This allows you to remotely implement version control, monitoring and provisioning across a fleet of devices whilst maintaining a high level of reliability, inherent from the containerization. As all the application that you deploy are loaded into containers, you can maintain a code base across a range of different hardware so long as it has support for Resin OS. Additionally, this means that devices are almost impossible to accidentally bricked in the field as applications are restricted to their own containers.
Although it’s a little more to it than in the image below, this gives a good understanding of the steps involved with deploying code and the feedback loop between hardware and the programmer.
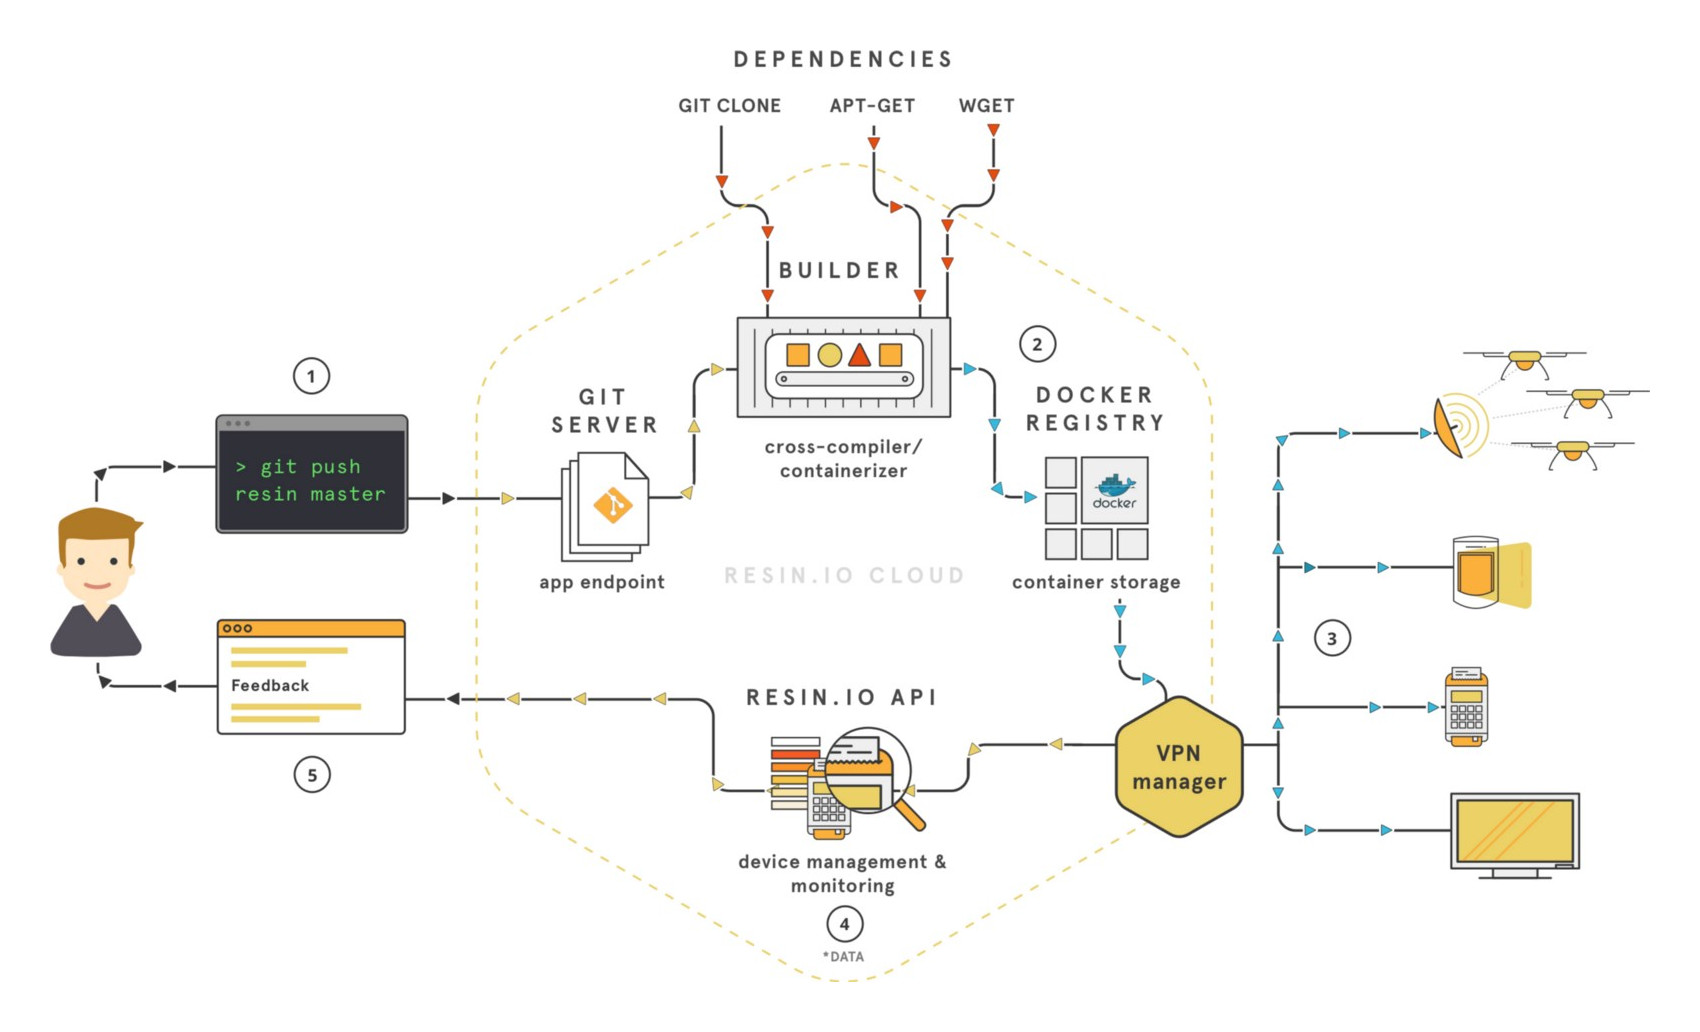
Resin Workflow (credit - Resin.io)
The Fin is Resin’s own take on what the hardware that powers Resin OS should look like. Typically, their examples and documentation are demonstrated on Raspberry Pi B devices, which while great for cheap and simple deployments, often isn’t fit for production scenarios.
The Hardware
From a hardware perspective, the Resin Fin offers a number of interesting technologies with an emphasis its on gateway-esq features. It’s clear from the Fin’s offering, that Resin sees this platform as an enabler of dependant devices (e.g. microcontrollers that use the Fin as a communication hub). By default, the Fin offers Dual-band 2.4 & 5 GHz support as well as Bluetooth 4.2 - good all around local area connectivity.
Form Factor
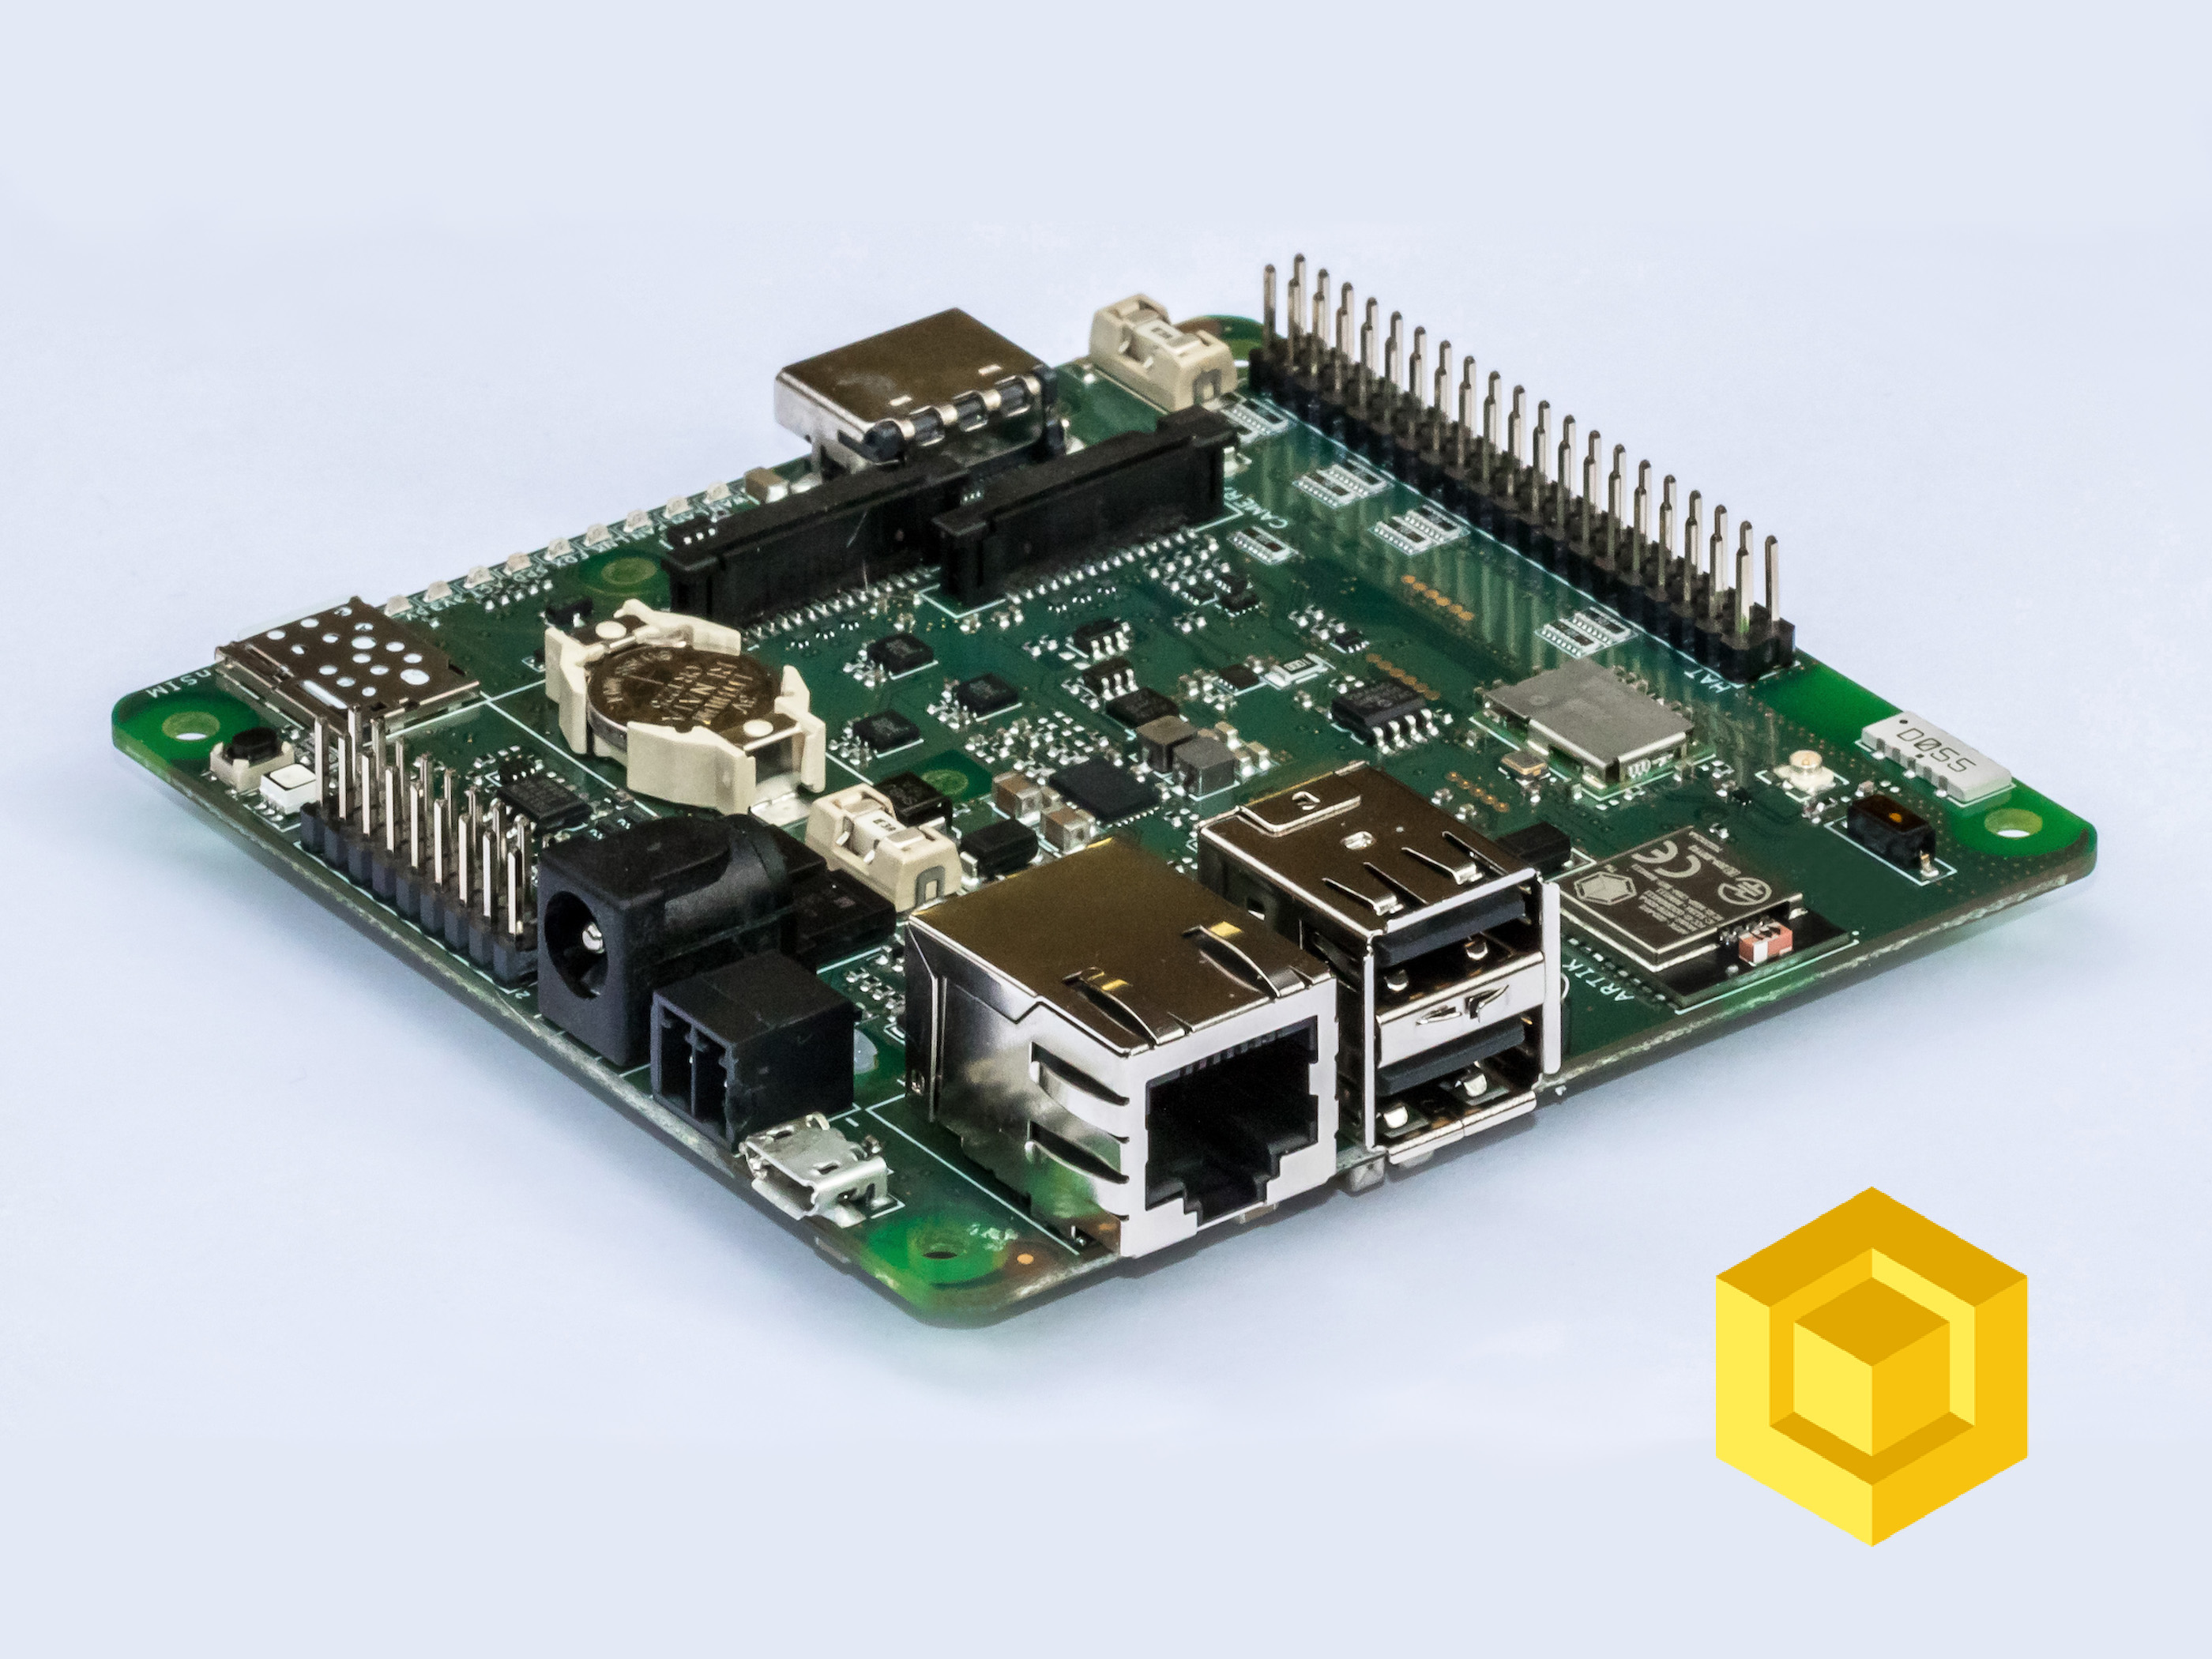
The Fin has a square profile of 90 mm by 90 mm with a height of approx. 25 mm, when the compute module is attached. I was surprised upon first unpacking the device as it was considerably smaller than the impression given by Resin’s blog post.
I understand that Resin will be selling their own cases, with variants including cases with DIN and VESA mounts. I look forward to seeing the quality of their offering but would like to see something with IP rated water proofing. It’d be ideal to mount a Fin onto an external wall or pole, exposed to weather conditions, to support outside deployments.
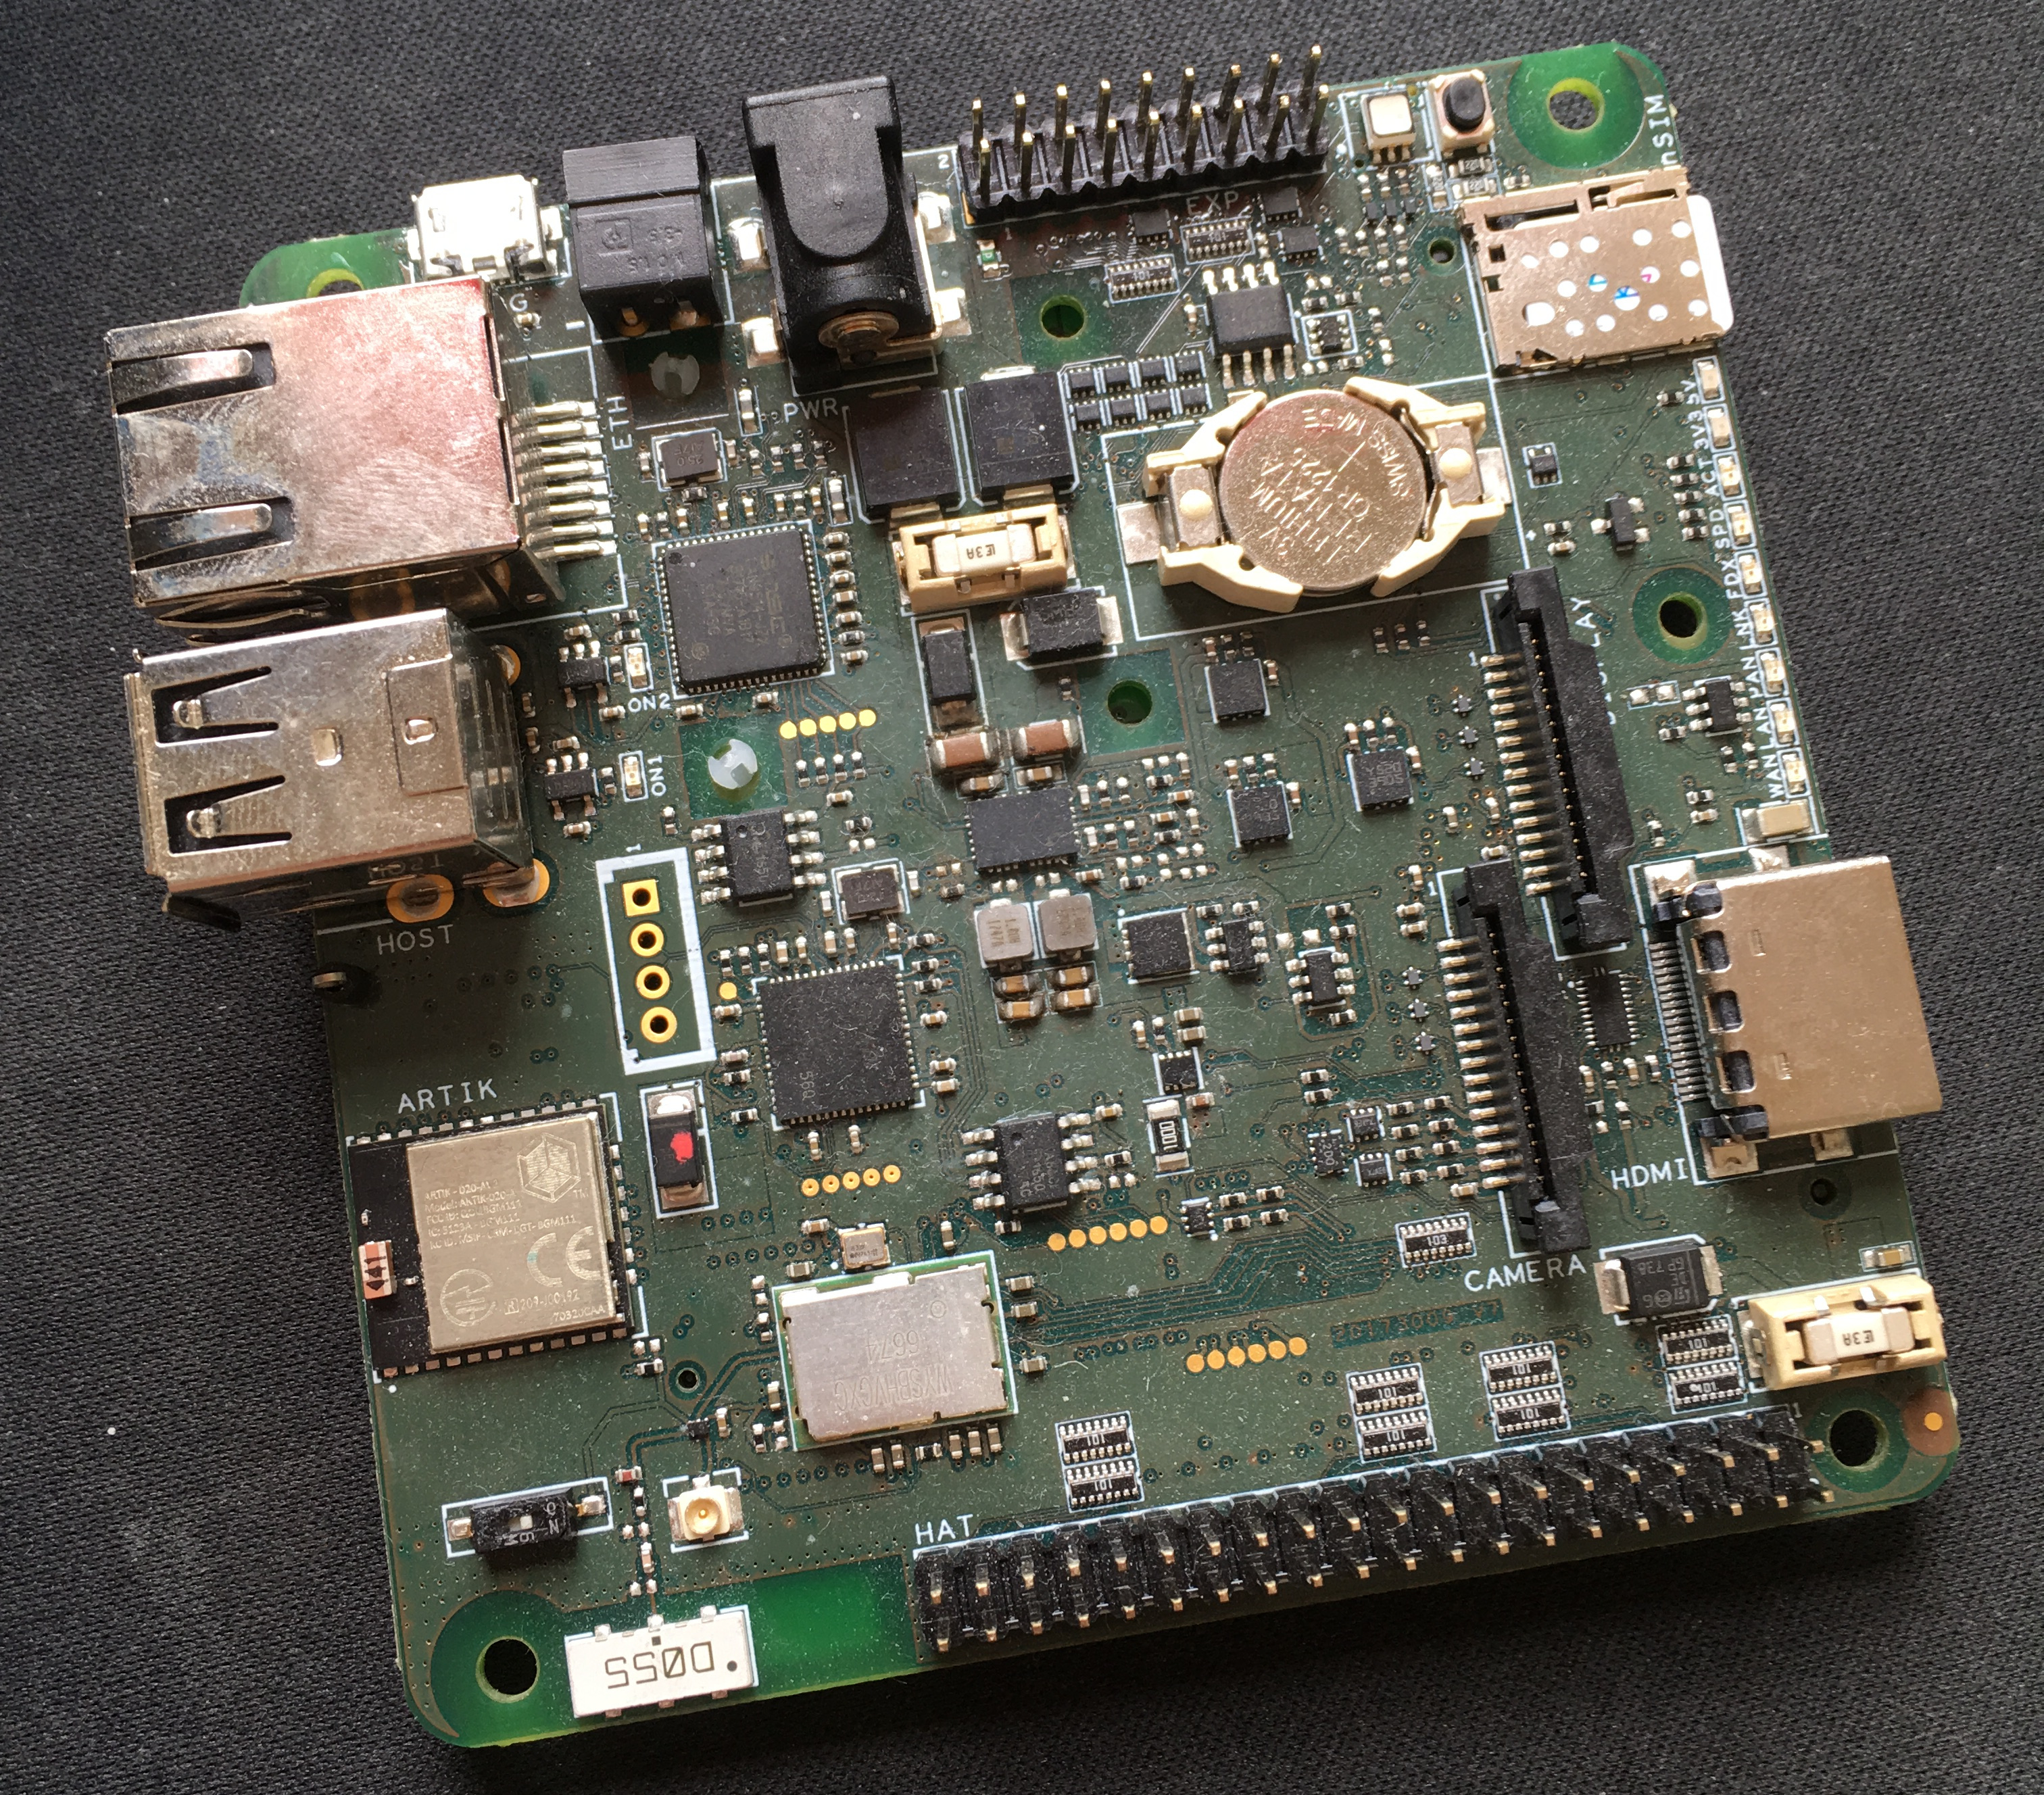
Top View
Power Management
The Resin Fin is an industrialised RPi Compute platform and this is reflected with Resin’s choice of power delivery. The Fin can take between 6 V to 30 V on either a barrel jack connector or phoenix connector, making it suitable for the kinds of voltages that you might find on a DIN rail (e.g. a typical PLC runs on 24 V DC).
Resin highlights features for power conservation including using the Artik Co-Processor for powering down the Compute Module as well as providing commands to power down various radio interfaces. Although interesting features, I personally see the Fin as an always on system more suited for gateway and high performance activities; I’ll touch more on this later.
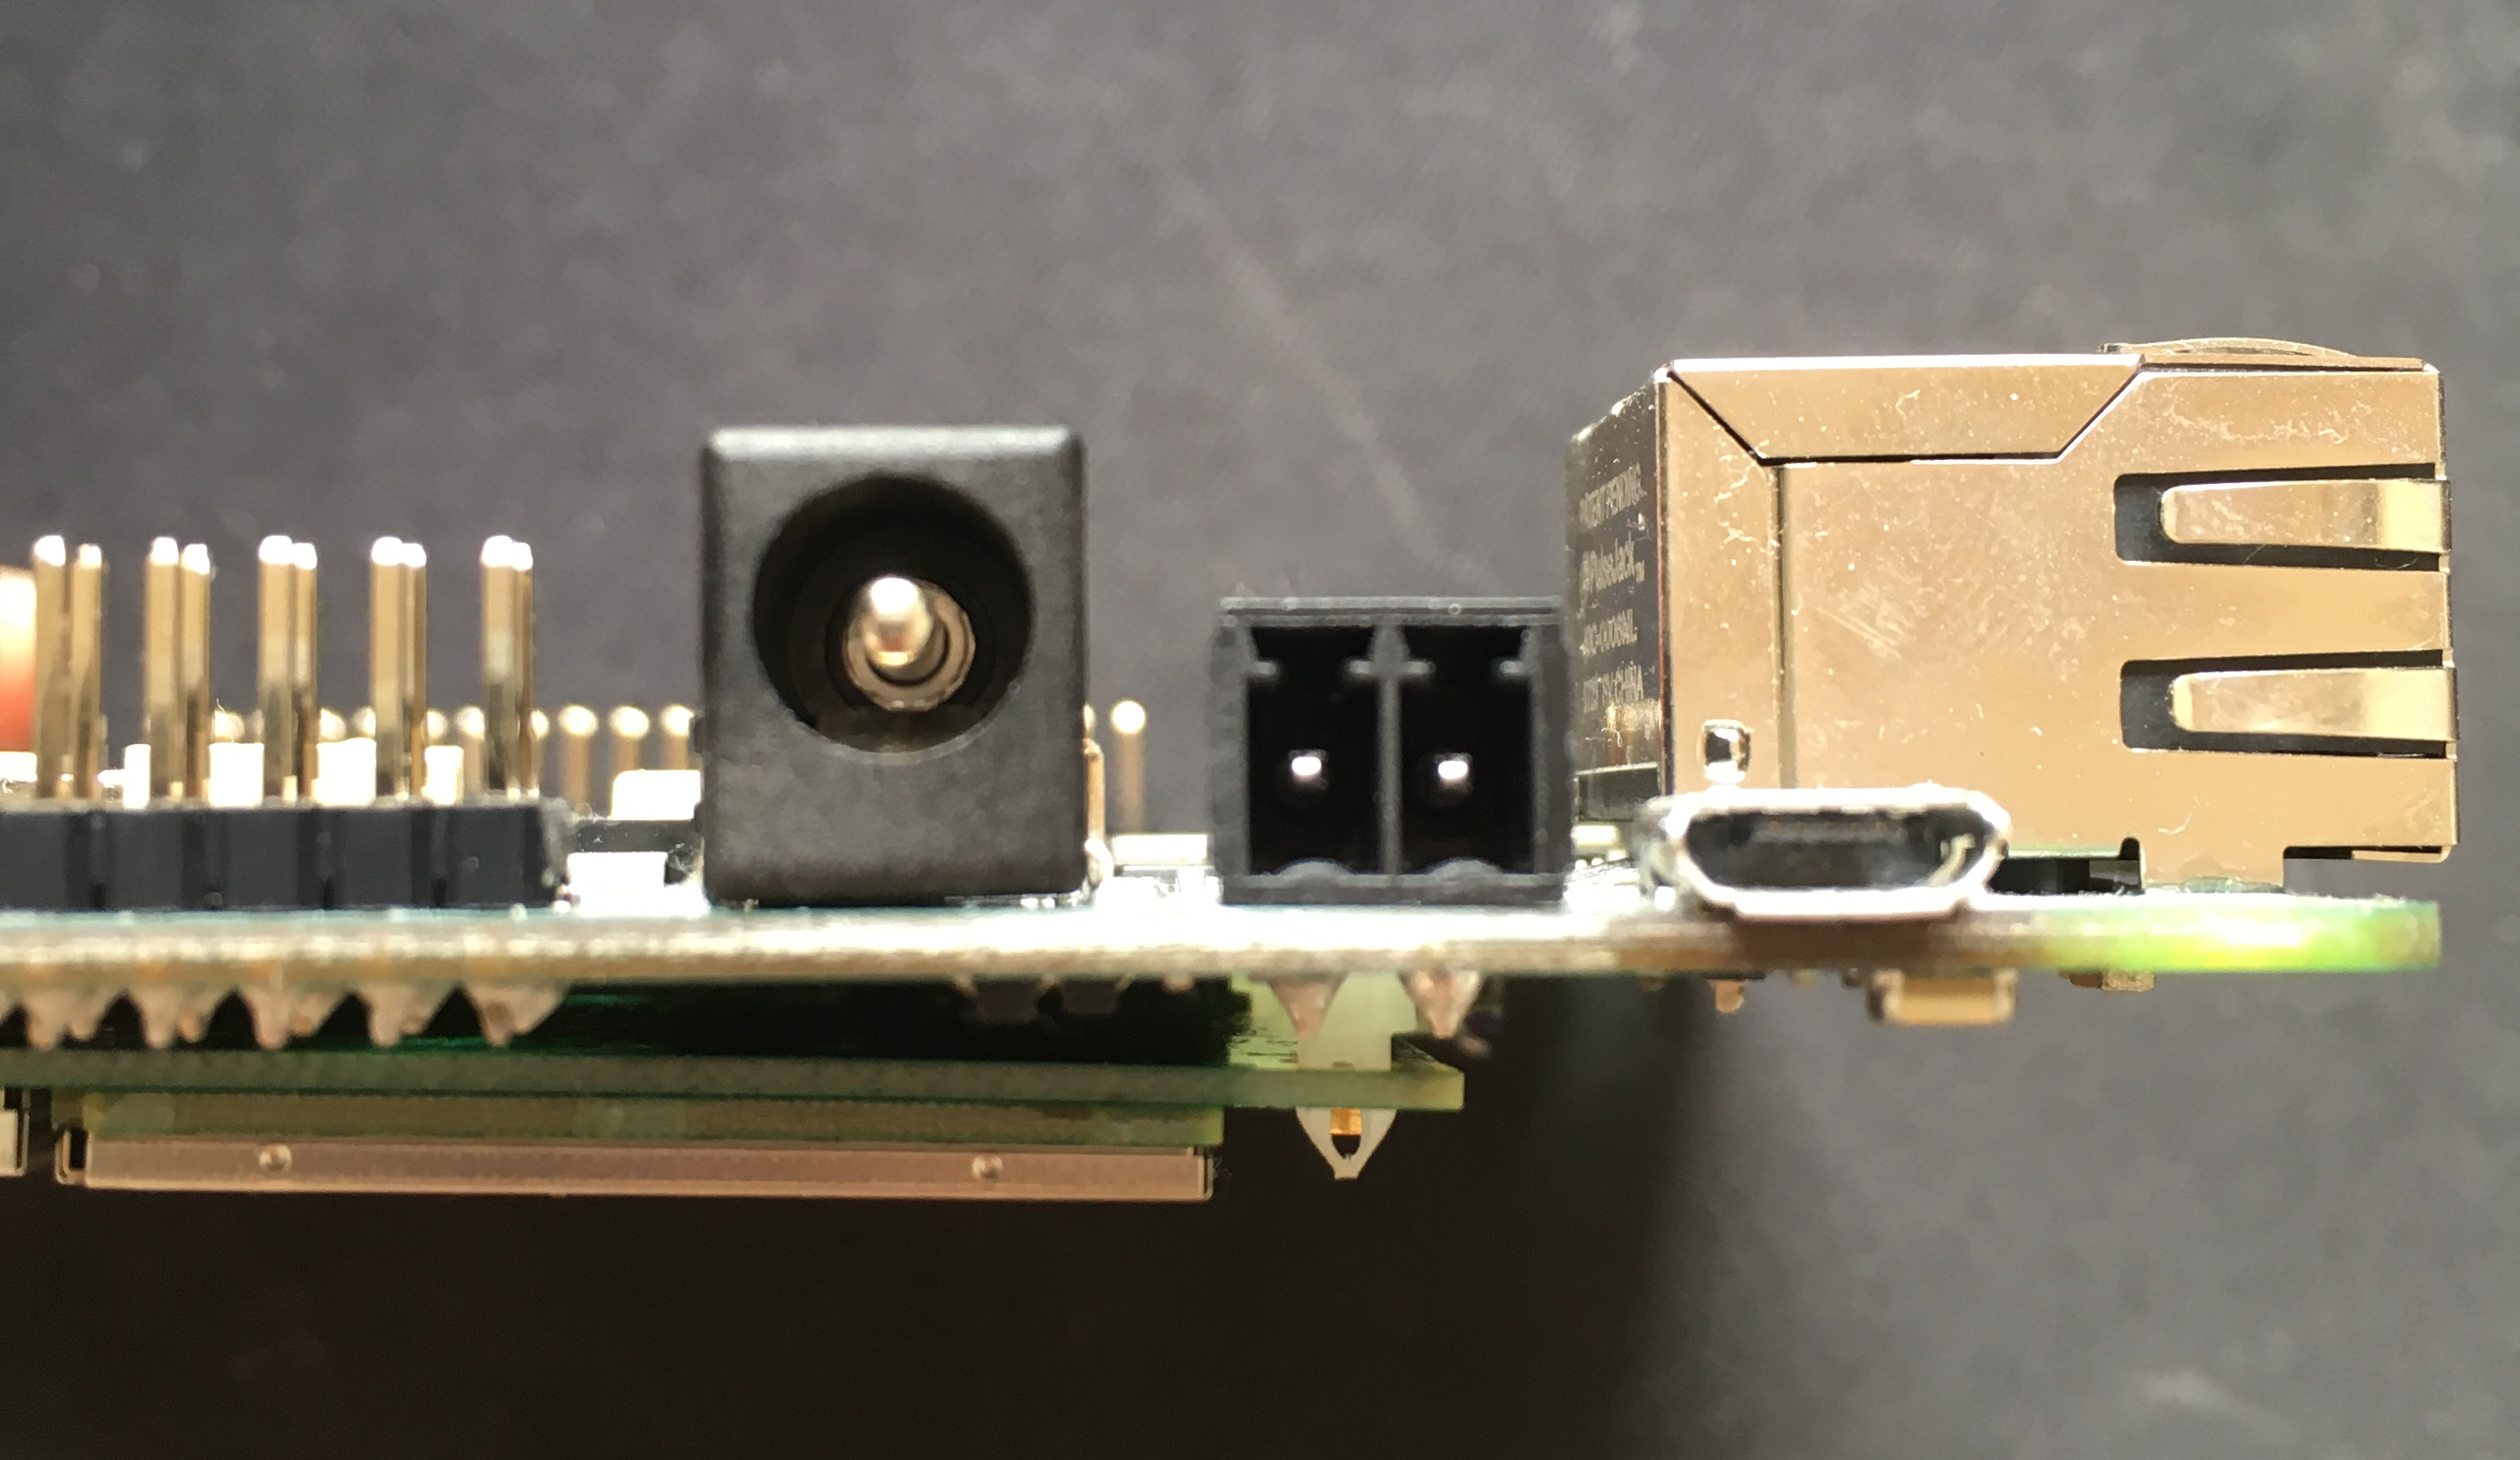
Power Connectors
Note - although the Fin has a micro USB port, you cannot use this to power the device as it is for debug purposes.
I/O and Expansion
The Fin has both the standard selection of I/O that you’d expect from a typical RPi device as well as a few special features too. As you’d expect, it has a 3.5mm output jack, the iconic RPi HAT connector, an HDMI port, 2x USB 2.0 ports, 10/100 Ethernet as well as display and camera connectors. The Fin provides a user customised RGB LED, which I’ve found useful for denoting the device’s networking status (Red for disconnected, blue for WiFi, Green for Ethernet, etc.) as well as user control over all the status LEDs on the board. The GPIO for the Artik 020 module are also broken out into a male header on the device. This includes SPI and I2C buses, Debug UART as well as 8 GPIO/ADC pins. There is also an on board real time clock connected on the I2C bus accessible by both the Compute Module and the Artik 020.
Additionally there’s also a Mini PCI-E socket exposed on the underside of the Fin, which I’ve used for a cellular modem but more on that later!
Compute Module 3 Lite
The Compute Module 3 Lite (CM3L) is a nice feature for the Fin as it provides an increased longevity for support as the CM3L can be swapped out for new modules as and when the Raspberry Pi Foundation releases them. The reason that Resin has chosen to use the Lite variant of the CM3 is that it means they can offer different variations of the Fin with support for 8 GB up to 64 GB of eMMC 5.1 Flash Memory, depending on the user’s use case. The CM3L uses the BCM2837, the same Broadcom chip found in the RPi 3, which is a quad core ARMv8 cluster, clocked at 1.2 GHz with its GPU at 400 MHz.
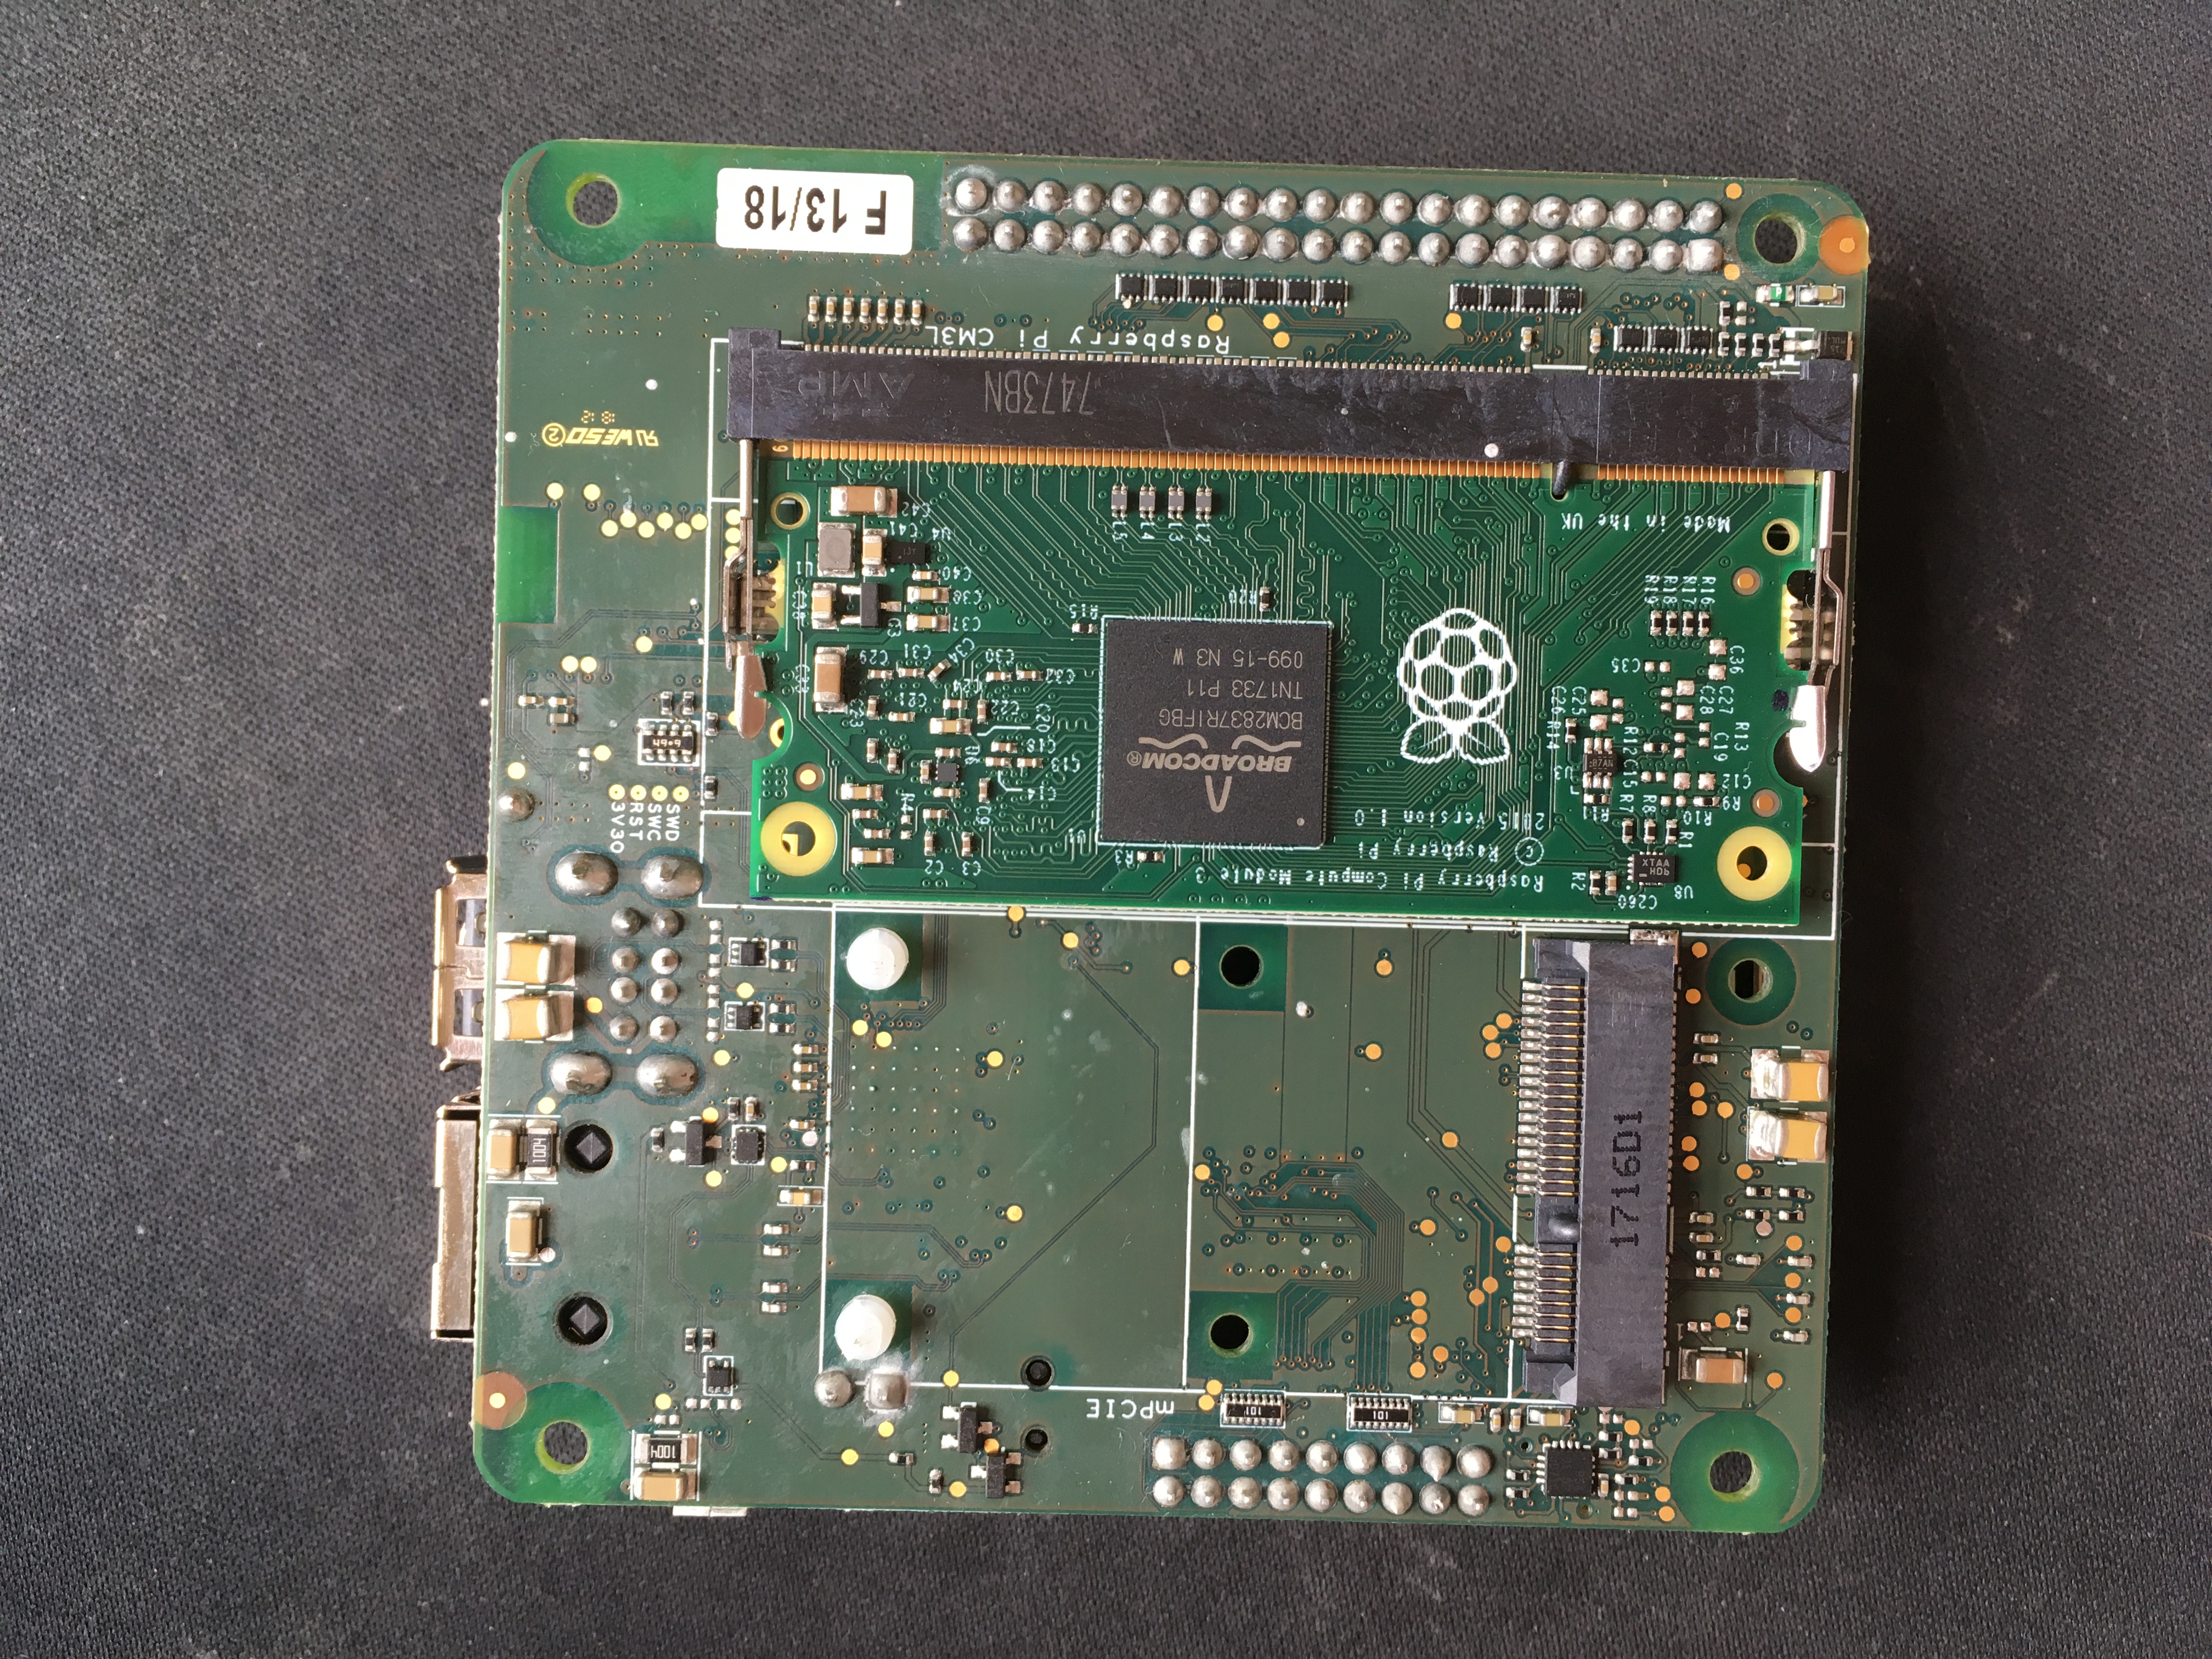
Rear View (CM3L)
Artik 020 Co-Processor
The Artik 020 co-processor is an interesting addition to the Fin as it allows for the entire compute module to be powered down and up, programmatically. The Artik is also on the same I2C bus as the Fin’s Real Time Clock (RTC) and can use this to track sleep timings.
I’m yet to use the Artik 020 in an application but I could see this being useful if using the Fin in a power conservative situation such as relying on a battery + solar power solution. It might also find use with using the Artik’s on board Bluetooth module for detecting the presence of external devices and using this as an interrupt to wake the Fin.
Resin has mentioned that they are implementing firmata support for the Artik to allow it to be controlled via a client library on the CM3L. This would make the process of it much more simple as all of the control could sit within the Resin OS user application container, rather than having to reprogram the Artik at each instance.

Artik 020 Co-Processor
Although I can see its uses, I don’t particularity envision the resin as a device that would utilise a sleep functionality; to me it’s better suited as an always on hub for relaying information back up to the cloud. Resin OS is most powerful when it can be updated immediately and instantly to any user changes/modifications. In my mind, resin devices are better as edge compute platforms or information relays rather than data aggregation which is better left to dependent devices such as microcontrollers, which then might use a Resin device as a back haul for their own telemetry.
Networking
As mentioned earlier, the Resin Fin has the standard offering of Dual-band 802.11ac/a/b/g/n with both 2.4 & 5GHz support as well as Bluetooth 4.2. I appreciate that they have provide a uFL connector for the WiFi/Bluetooth radio; as you might expect the Fin to be crammed into a PLC shelf or next to RF noisy equipment, where a decent antenna would be essential. You can toggle between this and the on board antenna via a switch on the PCB.
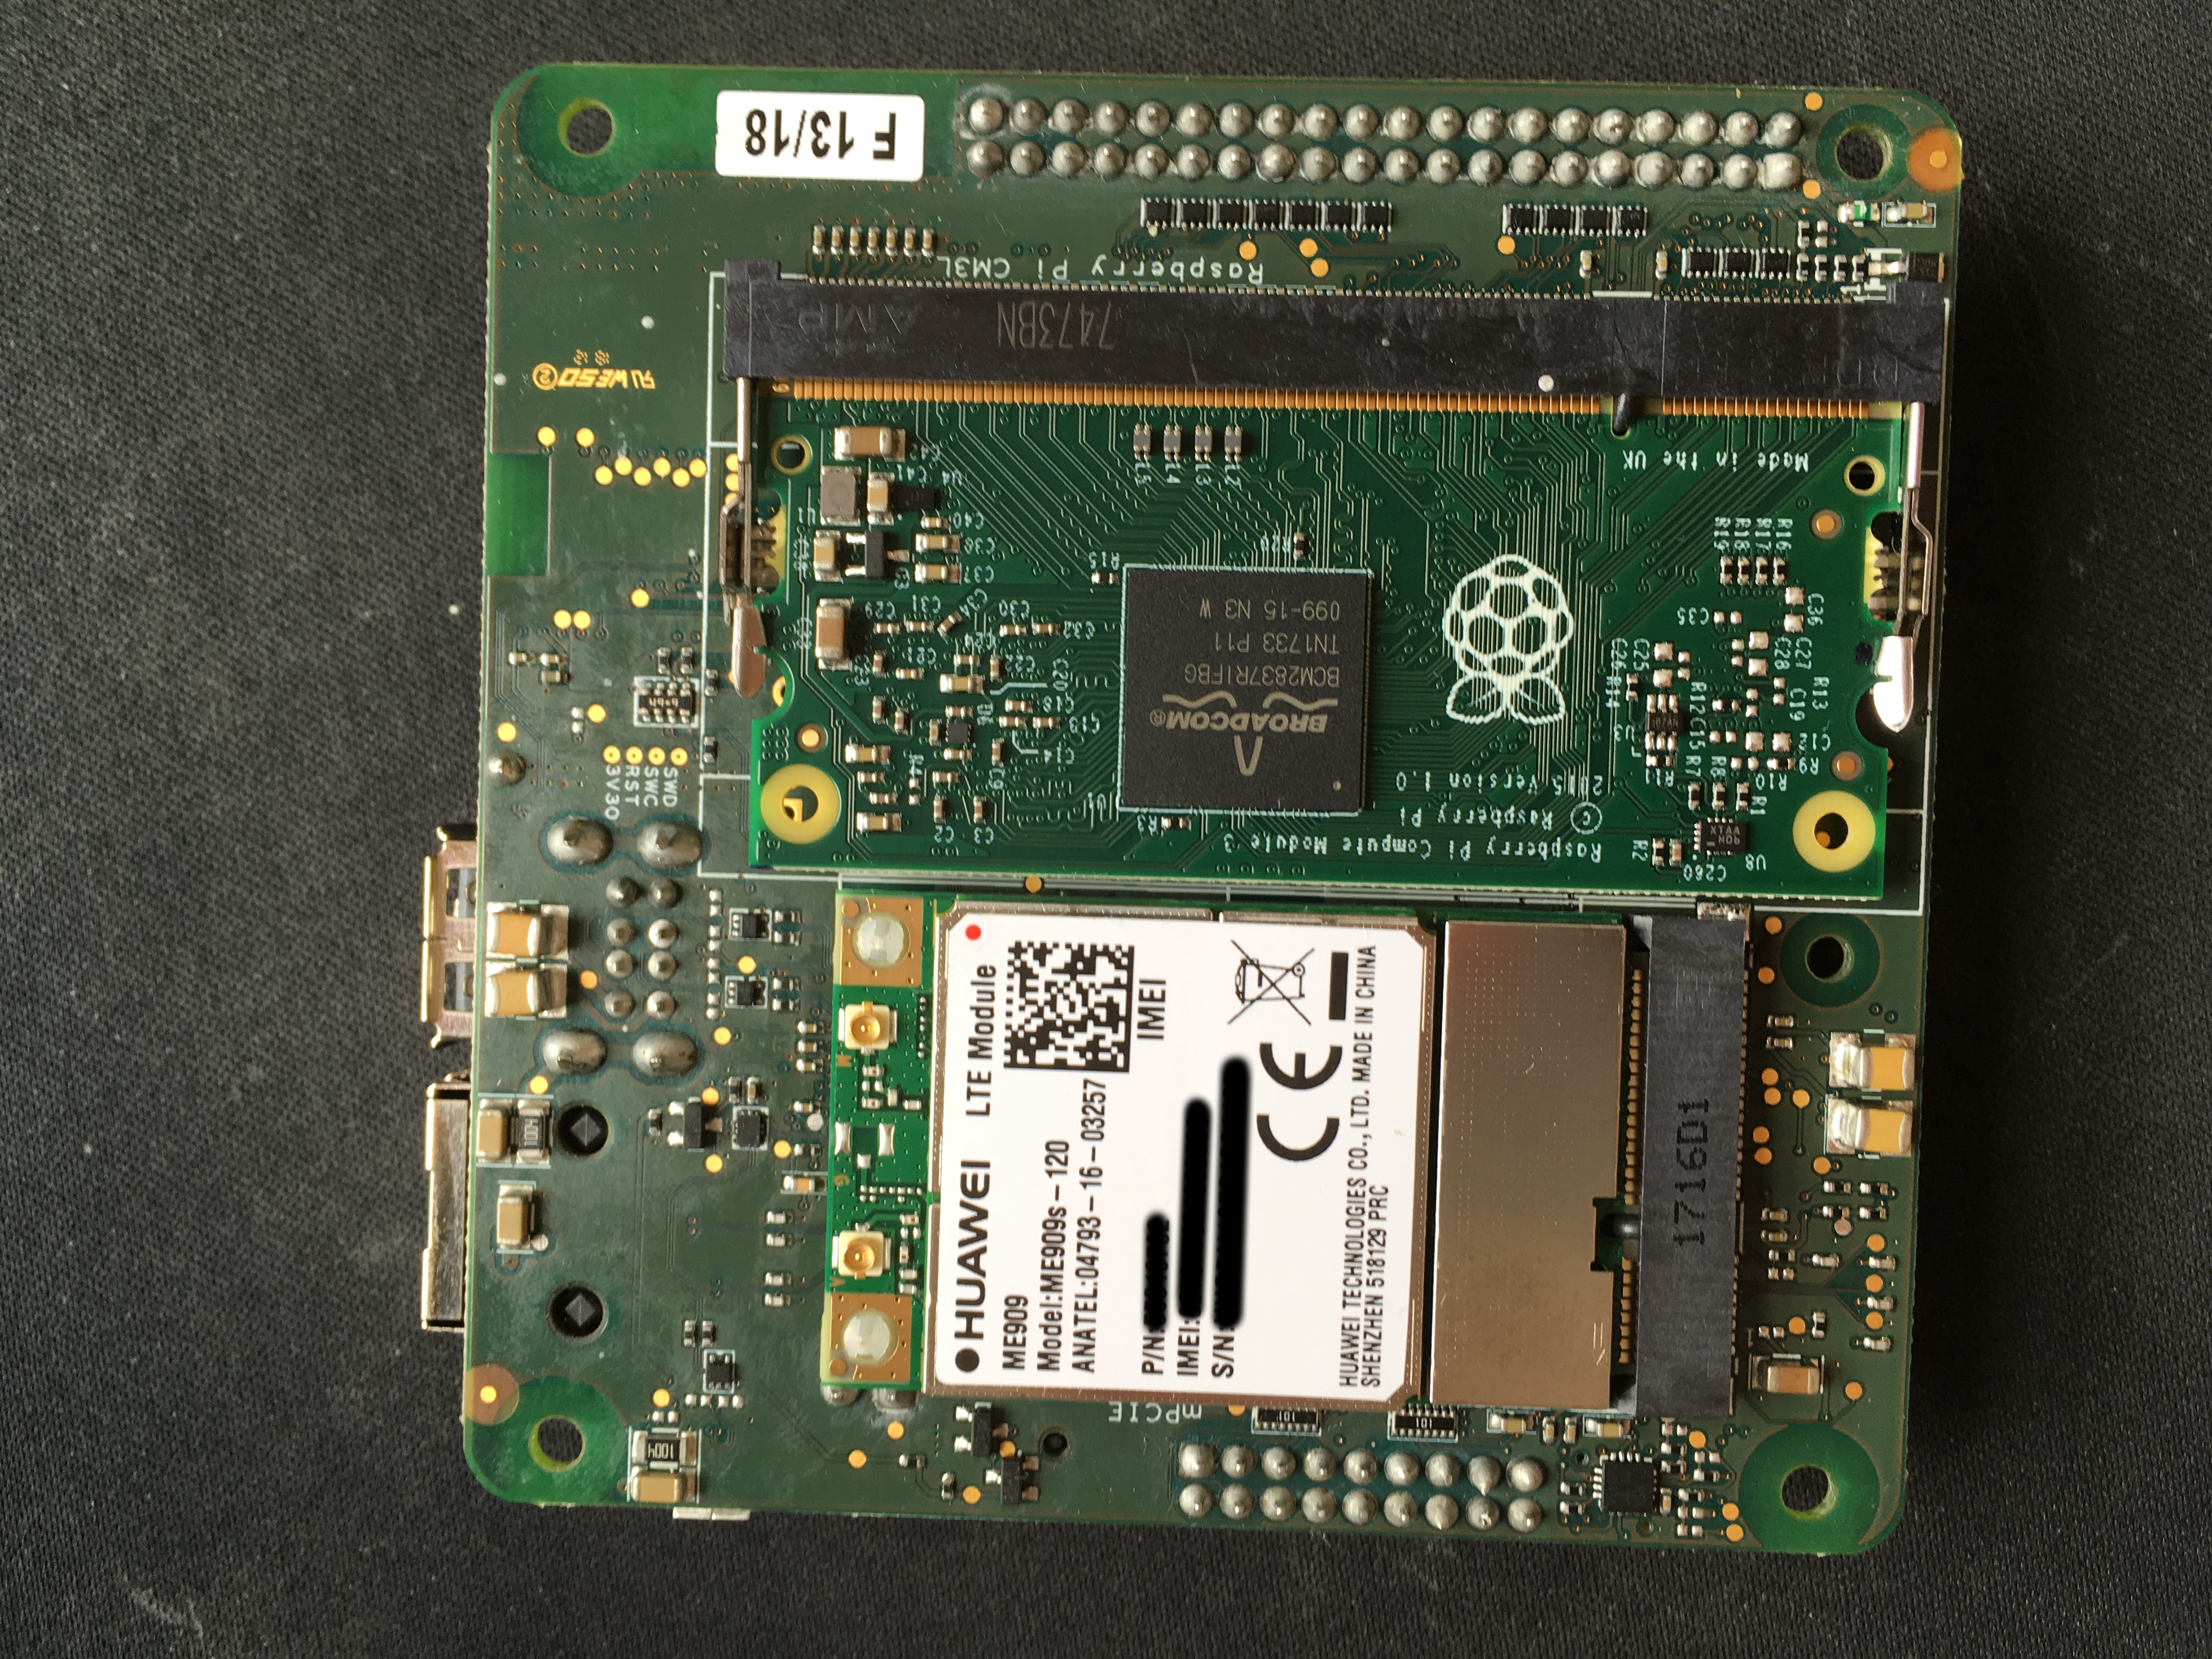
Rear View (CM3L + Mini PCI-E Modem)
I’ve included a Huawei ME909s-120 Cellular Modem (Mini PCI-E) with this blog post as cellular connectivity is an important part of the Fin’s offering. The ME909s-120 is an LTE capable modem with support for 8 LTE bands with up to 150 Mbps downlink rate.
I was impressed by how easy it was to get up and running with this modem. As soon as I had added the config for Network Manager (which works in conjunction with ModemManager), the Fin immediately picked it up and started transmitting data. I’ve included the config file for using Hologram’s Network below:
[connection]
id=resin-cellular
type=gsm
autoconnect=true

[gsm]
apn=hologram
number=*99#

[serial]
baud=115200

[ipv4]
method=auto

[ipv6]
addr-gen-mode=stable-privacy
method=ignore
Be cautious that this Network Manager config will immediately fire up the Cellular Modem begin transmitting your data over 3G/4G. This will spend your data allowance very quickly if you’re not careful!
It’s also worth mentioning that the Artik 020 has it’s own Bluetooth Modem and can use this for Bluetooth Low Energy (BLE) applications, independent of the CM3L.
The Software
From a software perspective, the Fin is basically the same device as any other device that’s running Resin OS and that’s the beauty of it! It shouldn’t be any different from a software perspective as all Resin OS devices abstract their hardware through the wonders of the Balena container engine.
The Setup Process
I’m cautious to comment on this as I understand that the Fin is still in development and that the Software/Set up Guides are not yet publicly exposed. I did find this somewhat convoluted and the instructions to be a little sparse but again, I have a pre-production device so this is to be expected!
To set the Fin up, I had to put the device into debug mode (connecting up the DBG micro USB port) which exposes the boot partition of the compute module. To do this on Linux (Debian), I was required to install the Raspberry Pi Foundation’s “usbboot” tool which is designed to access the boot partitions of the Compute Modules. Although a little confusing at first as to what was going on, this worked flawlessly and I was almost immediately granted access to the boot partitions on the device. Below are the commands required for usbboot under Linux.
$ git clone --depth=1 https://github.com/raspberrypi/usbboot
$ cd usbboot
$ sudo apt-get install libusb-1.0-0-dev
$ make
$ sudo ./rpiboot
I’m aware that this usbboot functionality is being built into Resin’s Etcher tool, so I withhold my criticism of this as set up tool, as Etcher is a fantastic tool for flashing OS images to SD cards and other types of storage media (i.e. it just works!). At present, you are required to used usbboot for the Fin to appear as a selectable target location under etcher, so run usbboot and then fire up Etcher and you should see your Fin device.
I did have a minor hiccup when setting the WLAN up as my Fin started up with its wireless interface initially labelled as mlan0 and with the interface set to down. However, after renaming the interface and through a couple of bash commands, I was able to get that working correctly. If you’re struggling with this, drop a comment below or reach out to me on twitter and I’ll try to help you solve this issue.
Resin OS
I won’t touch on too much detail here as I briefly explained what Resin is and how it works in the introduction - which on its own, doesn’t really do justice to completely describing how Resin works! I may have to do a more detailed write up in future blog posts.
Although intended for use with Resin OS, there’s nothing dictating that this hardware can only used with Resin’s tools; you’re more than welcome to put Raspbian, Ubuntu Mate or any other RPi distribution of your choice on there!
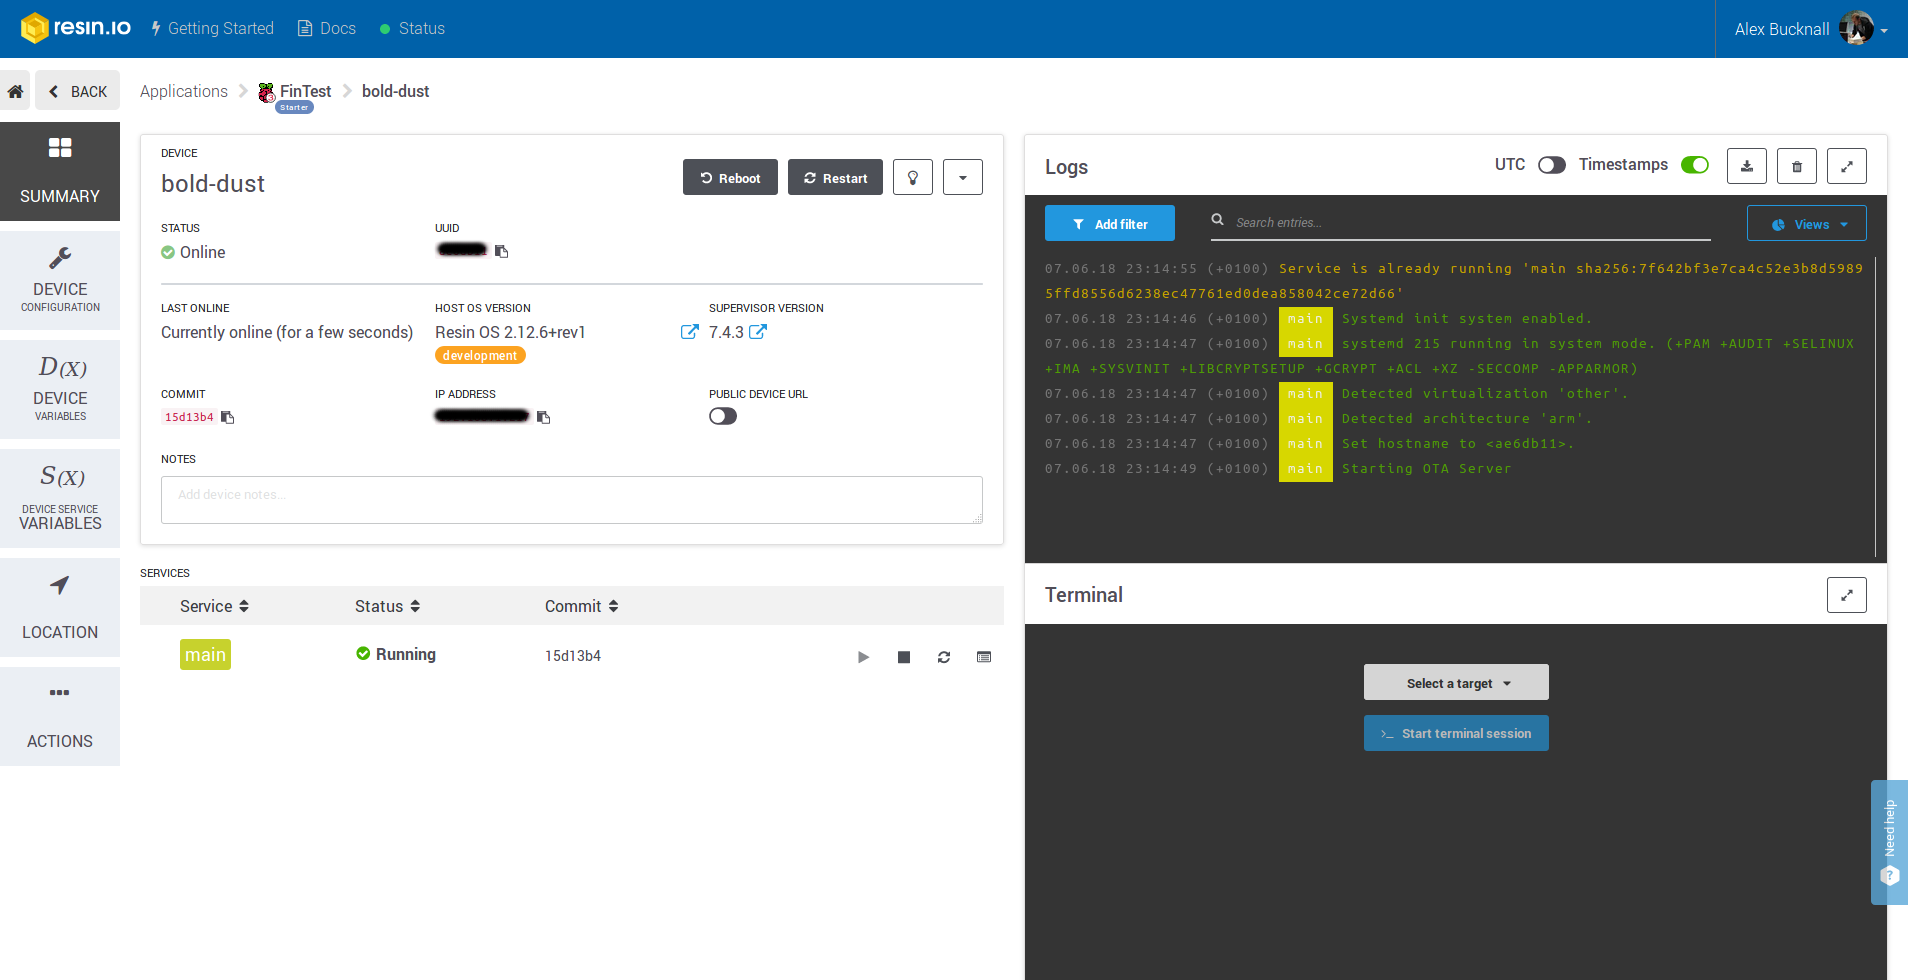
My Application - Resin.io
What’s nice about resin is that all it takes is a simple git push and you can iterate on the version of code running on your device. Once you’ve followed resin’s installation instructions, loaded Resin OS onto your device and added your git remote for your resin branch, all you need is the following:
$ git add .
$ git commit -m "Your commit to build for Resin"
$ git push resin master
And your code is pushed/built to a docker container at Resin.io before being forward onto your Resin OS device (if the image builds and deploys successfully). Resin does a nice job of informing you of build issues in its command line tool and will help you to debug any build failures.
Feature Requests
A feature that I’d like to see from Resin (which amazingly, they’ve already added to their public roadmap!) is the ability to check the size of an image delta (the difference in code between two commits) before pushing it to a device. With my scenario in particular, data consumption is an important aspect of the product; I need to know how much data the device will be consuming and how to keep this to a minimum. Pushing entire docker images to a device is something that I want to take place over WiFi rather than cellular and if I do need to push over cellular I need to know how much data it will consume.
Closing Thoughts & Impressions
Overall, I’m very impressed with the Fin and I think Resin have done a great job positioning its features and use case towards a clear gap in the market. The Fin will inevitably find its way to the maker audience but I think it’ll find a nice home in many industrial use cases. The Fin has all the right tools for supporting dependent device applications with its capable 2.4 & 5 GHz connectivity options. Combining this with the Fin’s ability to connect mini-PCIE radio interfaces (LoRaWAN, LTE, Zigbee, etc.) and Resin’s powerful OS means that the Fin is a also very capable gateway. I’m eager to see how Resin build the product with documentation and support as they’ve already laid the foundations for solid industrial applications.
I’m excited to see where the Fin ends up being deployed and I can already see application spaces such as the thingsnetwork being a great examples. If you want to dive into using the Fin as a gateway, I’d recommend checking out the Edge Node Manager as well as an image I’ve written for Firmware Over the Air with Pycom devices.